An Easter Tradition at Cottage-in-the-Meadow Gardens
Feb 5, 2015
I still remember the joy and excitement I felt at age five when, for the first time, I found my very own Easter bunny nest.
Easter egg hunts were woven into the social fabric of our seven little villages many decades ago. Families had hunts for their own children, to which young friends from other families were invited. If you had a lot of friends, you ended up with more eggs than your parents knew what to do with. I certainly wasn’t going to eat them all—if any! I still remember what that dry, crumbly yolk and gummy white rubber felt like in my mouth. Disgusting!
But the bunny cookies that always accompanied the eggs in their green Cellophane nests were another story entirely. They were the best cookies ever, even better than those at Christmastime. Often they were unfrosted, but occasionally I’d find a special one with vanilla icing. In either case, I always included the raisin- or chocolate chip eye in my first bite.
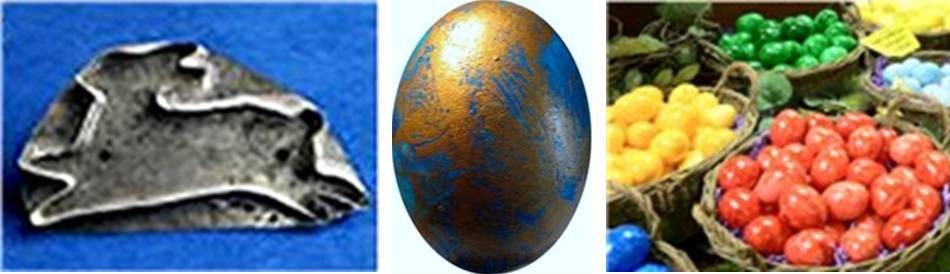
From left: Antique Amana cookie cutter, one of my gilded eggs, Amana glue eggs
Made by the local tinsmith, the cutter for this running rabbit cookie was always the same size and shape. The cookie was about three inches wide and seven inches long from the tip of the back legs to the tip of the front legs. It was quite a sizeable cookie. I’ve included the recipe for it at the end of this article.
The coloring of eggs for Easter was a tradition that Amana settlers brought with them when they emigrated from Germany in the 1800s. The eggs in Amana nests continued that tradition, but were hand dyed using a special process that created a marbled effect. Furniture glue from the communal furniture factory was mixed with hot water and dye from the communal woolen mill and then swirled onto hard boiled eggs with one’s fingers. It was a messy process that resulted in multicolored fingers for several days afterward, despite vigorous scrubbing.
Amana nests nowadays sport eggs dyed by a more conventional and less messy process. However, each year one of the local merchants rounds up helpers for a marathon dyeing session to create the old marbled eggs. Tourists love them, often buying several dozen at a time.
For many years—until she retired—the children from my wife, Wilma’s, preschool came to our gardens to hunt for eggs at Easter time. At some point during this period, Wilma began using Elmer’s Glue mixed with food coloring to dye her children’s eggs. When dry, the eggs took on a beautiful sheen and intense color. As with the eggs of old, it was a messy process that stained one’s fingers, but food coloring proved to be much easier to remove than dyes for wool. Another plus for glue-dyeing eggs in the present day is the availability of latex gloves to wear if we want to avoid stained fingers.
A new twist
Having helped Wilma dye eggs with her glue method, I wondered what they might look like if I added swirls of gold paint on top of the colored glue layer after it was dry. I was quite pleased with the result and would like to share the process with interested readers.

Materials for making Cottage-in-the-Meadow Easter eggs

From left: Elmer's glue and food coloring, gloves for coloring the eggs, gold spray paint, gloves for swirling gold paint, abrasive cleanser and brush
White Elmer's Glue and
your choice of food color is
all you need.
Latex gloves keep the color
on the egg and not on your
hands.
Any metallic gold
spray paint will work.
Texturized kitchen gloves
will help create interest-
ing swirls.
Abrasive cleanser with
bleach will remove stains.
Scrub fingers with a vege-
table brush after applying
abrasive cleanser.
Step 1: Preparing the eggs
Purchase the egg size you prefer (jumbo, extra large, large, medium, small). Normally, Easter eggs are boiled before they're decorated. However, for this project don't boil them. After several weeks, boiled eggs start to smell really bad. The only way to get rid of the smell is to let them age and let nature take its course. Since the eggs for this project are not edible after they're decorated, don't boil them. There will be no smell as the eggs age.
Step 2: Preparing the work surface
Find a surface that is level, so that your eggs will not roll into one another or fall off the surface. Cover the surface with plastic sheeting to prevent stains. NOTE: I used waxed paper the first time I tried this method, and the colored glue actually soaked through it unto the surface underneath.
Step 3: Gathering your materials
You will need the white variety of Elmer's glue, food coloring in the colors you plan to use, and latex gloves if you want to keep your hands and fingers clean.
Step 4: Coloring the eggs
You may wish to do a small batch of eggs the first time, so that you can practice a bit, experiment with the color intensity (the more food coloring, the darker the color), and note the approximate amount of glue you will need for each color. The glue will become thinner, the more food coloring you use, so that dark colors will make more mixture than light colors, given the same amount of glue.
Begin by pouring a measured amount of glue directly on your work surface. Add food coloring and mix with your fingers. Start with a small amount of color and then increase until you have the approximate shade you want. The color, when dry, tends to be a bit darker than the color of the mixture.
Once the egg is thoroughly coated, place it back on a clean area of the surface to begin the drying process. You can let your eggs dry naturally, which will take several hours, or you can use a fan or even a blow dryer to hasten the process.
You may want to turn the eggs occasionally as they are drying, to prevent the pooling of the coating at the base of the egg. I have discovered that if you plan to gild the eggs later, it does not really matter if a spot forms with little color and a dark ring where the mixture has pooled. The gilding process blends the spot into the egg so that it is barely or not at all noticeable.
Obviously, you will need to wash your bare or gloved hands every time you change colors. If you are not near a sink, have a bucket of water and an old towel nearby before you start. It is not necessary to scrub bare fingers and hands every time you change color. Just rub your gloved or bare hands together in the water and towel dry. To get your hand and fingers clean if you did not wear gloves or accidentally got some color on your gloved hands, rinse them and sprinkle them with some abrasive cleanser containing bleach. For stubborn stains, especially under fingernails, scrub with cleanser and a vegetable brush.
Step 5: Gilding the eggs
Once the eggs are dry, you can begin the gilding process. You will need a pair of textured—as opposed to smooth—kitchen gloves (see photo). I use ordinary newspaper on a level floor as a work surface in an area where overspray is not a problem. Make sure that the area is well ventilated.
Shake the spray can according to directions, take an egg in one hand and spray it with the other. Just spray a blob of paint on one area of the egg, set the can down, and then distribute the paint quickly over the egg in random fashion with your gloved fingers. The ridges on the gloves will create interesting patterns, such as the one on the egg image at the beginning of this article. You may need several attempts to discover how much paint to spray on each egg to achieve the desired look. Too much paint will result in a completely gold egg or in almost no pattern.
Put each finished egg on the newspapered surface to dry. I turn the eggs once about 10 or 15 minutes after they have been sprayed to keep them from sticking to the newspaper. The paint should be dry in about an hour.
Please note that at this point the eggs are no longer edible.
Surprisingly, the glue and paint do not seal the eggs completely. That's why hard-cooked eggs smell.
Amana Running Rabbit Cookies (Osterhasen)
2 1/2 cups granulated sugar
2 1/2 cups brown sugar
1 1/4 cups vegetable shortening
1 1/4 cups butter
15 eggs
13 teaspoons baking powder
15 cups flour
2 1/2 cups milk
1 to 2 cups raisins or chocolate chips
In a large mixing bowl, cream sugars, shortening, and butter. Beat in eggs, blending well after each addition.
In a second bowl, mix flour and baking powder. Stir flour mixture into batter, alternating with 2 cups milk. Add final 1/2 cup milk only if the batter seems too dry. (The size of the eggs may make batter too moist or too dry.) You should end up with a very soft dough.
Dough must be refrigerated at least overnight. Since this is a soft dough and can be difficult to cut out, you may want to place dough in freezer one hour before baking. Roll out portion of dough on well-floured board. Keep remaining dough in the freezer or refrigerator while you are rolling or cutting. Using a rabbit cookie cutter, cut into shapes and place a raisin or chocolate chip in each for bunny's eye.
Bake at 350 degrees for 10-11 minutes. If icing cookies, allow them to cool completely first.
Recipe yields about 10 dozen cookies.
This original recipe comes from the Zuber Communal Kitchen in Middle Amana. It is reprinted in "Seasons of Plenty" by Emilie Hoppe, Iowa State University Press, 1994.
Amana glue eggs courtesy of Amana Society, Inc.
Cookie cutter image is of unknown origin.
Remaining photos in this article are the author's.